Software
Note
Page under development. This page is missing:
- Basic tests on the software, to check that everything is working at each stage.
Software Setup Guide
Required skills and resources:
- A working local WiFi network, with internet access.
- Basic proficiency with computers and IP networks.
- Raspberry Pi and 32GB+ micro SD card.
Depending on your background, the Network setup may be the most challenging part of the guide, which depends on your LAN settings and the operating system on your computer - which we do not control.
Hang in there!
Overall steps in this guide:
- Load the Pi ISO to an SD card.
- Configure a network connection.
- Set or find the Pi's IP address on your local network.
- Install all software components.
Operating Systems
To get started with the software setup on a Raspbery Pi, you need to write an OS to a micro SD card.
Pipettin OS
Pipettin OS is a full system image of a configured OS for the Raspberry Pi, based on either Raspberri Pi OS or Ubuntu for Raspberry Pi.
To install Pipettin OS follow the OS flashing guide.
Tip
This is the recommended way of installing pipettin's software.
If you use Pipettin OS, you may contine with the next steps at the end of this guide, and skip everything else.
Raspberry Pi OS
Follow this guide to start loading Raspberry Pi OS to an SD card.
Then continue with the software setup below.
Power Up
After installing an operating system to a micro SD card, its time to power up the Pi for the first time.
Use a provisional power supply
When mounted on the robot, the Pi will be powered through its GPIO header. If you have not yet assembled the electronics, we can use a regular USB-C power supply for the time being.
Raspberry Pis version 4 and 5 require a (USB-C) power supply, capable of delivering 2A-3A. Supplies with insufficient current ratgins are very commong, but the Pi may still work (although it may throttle).
To power up the pi:
- Insert the SD card with the OS to the slot on the side of the Pi.
- Connect a power supply to the Pi thorugh its USB-C port.
- Wait for it to power on. The onboard LEDs of the Pi will flash in particular patterns to indicate its status.
Raspberry Pi LED status reference
Raspberry Pi 5: - Red LED (power): Shows power issues when ON (e.g. there's a problem if its always on). - Green LED (status): Shows SD card activity and blink codes.
Raspberry Pi 4: - Red LED (power): Shows power issues when OFF (e.g. there's a problem if it blinks). - Green LED (activity): Shows SD card activity and blink codes.
If the LEDs flash in a normal pattern, the operating system is up, and its time to connect to the Pi.
Connect to the RPi
To install the software components, you first need access to a terminal on the Pi.
Choose one of these access methods:
- 🌐 For network setups, follow the headless configuration instructions.
- This option is recommended to operate the robot through the network (i.e. from a different computer).
- It works if you do not have (or want) a display and keyboard for the raspberry pi.
- It involves network configuration on the pi, and finding its address on the local network (although pipettin.local might just work).
- 🖥️ Otherwise, connect a keyboard and monitor to the Pi, as described in the standalone Pi setup guide.
- If your Pi is powerful enough to handle everything (including a desktop environment and web browser), you won't need a second computer to use the robot.
- This is great if you don't feel comfortable with networking.
Software setup on a Raspberry Pi
This section holds instructions to install all software components to a Raspberry Pi, working from a Linux computer.
Instructions for regular PCs running other operating systems in the Software setup on a PC section below.
Note
This guide is meant for somewhat experienced Linux users.
Requirements
- Internet connection.
- Raspberry Pi computer:
- Model B, version 3 or greater (must be 64-bit).
- At least 4GB of RAM for the full experience (or 2GB for basic use).
- Micro SD card with 32GB capacity or greater with a suitable os installed.
- Access to the Pi's terminal, through the local network or via keyboard/monitor.
Minimum RAM requirements
A Raspberry Pi with only 1GB or 2GB will run the minimum required software (from firmware to web ui).
However, it will struggle with serving JupyterLab at the same time, or perform any RAM/CPU intensive task.
Keep in mind that a high system load will probably make Klipper crash. It needs some breathing room.
Update system packages
Run these commands on the Pi's terminal to update its software:
Optionally install command-line utilities to monitor resource usage:
Install Klipper
Here we will install only the "software" side of Klipper, that runs on a regular computer (e.g. a Raspberry Pi or Linux PC).
The firmware will be flashed to controller bards in the electronics setup guide later on.
The Klipper software stack
Klipper is "a 3D-printer firmware", but it is actually a stack of several programs; from actual microcontroller code to a web frontend.
These programs are:
- Klipper: the actual firmware, which runs on micro-controllers only.
- Klippy: the "host firmware", which runs on a PC, and is responsible for motion planning.
- Moonraker: a websocket-based "API" for Klippy. It connects to Klippy and manages the PC's operating system.
- Mainsail (or Fluidd, etc.): front-end user interfaces, used from a web browser.
In contrast, other controller boards implement everything in firmware. For example, the Duet2 board runs the RRF firmware, and also serves a web frontend thorugh WiFi, from the same board, without the need for an additional computer. We use Klipper because it runs on on cheap and expensive hardware alike.
First download the latest version of KIAUH:
We’ll need to configure KIAUH to use our own Klipper fork, called klipper-for-cnc. This is needed to use home the extruder axes, used for pipetting, and the tool-changer motor.
Edit the kiauh/klipper_repos.txt file to append naikymen/klipper-for-cnc,pipetting after the last line. For this, you can use the echo command:
Finally, to start KIAUH, use the command:
When KIAUH is running, you should see something like this:

Use the following options to select our Klipper fork for installation:
- Choose option
S(settings). - Choose option
1(Switch Klipper source repository). - Add the folowing repo URL:
https://github.com/naikymen/klipper-for-cnc - Set the branch name to:
pipetting
Now you'll use KIAUH's interface to install Klipper, Moonraker, and Mainsail.
Info
If any warning window appears, select OK.
- Go to the main menu, and select option "
1- [Install]". Once on the general installation menu, use the available options to install Klipper, Moonraker, and Mainsail.- Press
1to select Klipper. - Press
1to select the recommended python version (the default). - Press
1to select the number of Klipper instances (the default, just one).
- Press
- Install Moonraker.
- Press
bto go back to the main menu of KIAUH. - Press
1to install another component. - Press
2to select Moonraker. - Press
yto install.
- Press
- Install Mainsail.
- Press
bto go back to the main menu of KIAUH. - Press
1to install another component. - Press
3to select Mainsail. - Press
yto install.
- Press
Klipper Plugins
Finally, install the DynamicMacros plugin, as explained in its documentation.
Briefly, run the following:
cd ~
git clone https://github.com/3DCoded/DynamicMacros
cd DynamicMacros
sh install.sh
sudo systemctl restart klipper.service
Finally, add an entry for DynamicMacros to the moonraker.conf file
Add the following contents to the end of the file:
# DynamicMacros Update Manager
[update_manager DynamicMacros]
type: git_repo
path: ~/DynamicMacros
origin: https://github.com/3DCoded/DynamicMacros.git
primary_branch: main
is_system_service: False
install_script: install.sh
Restart moonraker:
Using another firmware
At the moment the controller (piper) only streams commands to Moonraker, and thus only works with Klipper.
It would require some coding effort to support, for example, the RepRap firmware (RRF) on the Duet, or Marlin firmware on other boards, with their native firmware. Originally this project worked with GRBL, which was replaced because it could only drive 3 axes (and we needed at least 5), and code for it can be found in archived branches of OLA's git repos.
The changes mostly involve creating a new controller class in piper, mimicking KlipperCommander in all ways, and replacing KlipperCommander with it in the Controller class.
Here are the main files:
The above instructions were adapted from th33xitus.
klipper_repos.txt.example
Previous versions of KIAUH included a klipper_repos.txt.example template file.
To use it, we required the following command to copy klipper_repos.txt.example to klipper_repos.txt:
Install MongoDB
Install MongoDB version 4.4.15 in the Raspberry Pi. This requires a 64-bit Raspberry Pi (e.g. 3 or greater).
Instructions adapted from Adapted from the guide at mongodb.com.
MongoDB 8.0 on Trixie
MongoDB has not yet released an official repository dedicated to Debian 13 (Trixie). Using the Debian 12 (Bookworm) repository is the standard workaround.
To get the arm64 server packages on Trixie, you must use the Ubuntu 24.04 (Noble) repository instead. It provides the full suite of binaries and is natively compatible with Debian 13.
sudo apt update
sudo apt install -y gnupg curl

curl -fsSL https://www.mongodb.org/static/pgp/server-8.0.asc | sudo gpg -o /usr/share/keyrings/mongodb-server-8.0.gpg --dearmor

echo "deb [ arch=arm64 signed-by=/usr/share/keyrings/mongodb-server-8.0.gpg ] https://repo.mongodb.org/apt/ubuntu noble/mongodb-org/8.0 multiverse" | sudo tee /etc/apt/sources.list.d/mongodb-org-8.0.list

sudo apt update
sudo apt install -y mongodb-org

mongod --version  # Should print v8.0.23
MongoDB 4.4
These instructions worked for older versions of Raspberry Pi OS (e.g. Trixie / Debian 12) on a Raspberry Pi 4B.
In this system, version 4.4.15 is strictly required.
- Install the MongoDB 4.4 GPG key.
Note: Warnings may appear around apt-key, but if an error occurs try this alternative instead: https://itsfoss.com/apt-key-deprecated/
- Add the source location for the MongoDB packages.
echo "deb [ arch=amd64,arm64 ] https://repo.mongodb.org/apt/ubuntu focal/mongodb-org/4.4 multiverse" | sudo tee /etc/apt/sources.list.d/mongodb-org-4.4.list
- Download details of the MongoDB packages.
Troubleshooting: invalid signatures
The apt update command can fail with an error similar to the following:
The following signatures were invalid: EXPKEYSIG 656408E390CFB1F5 MongoDB 4.4 Release Signing Key <packaging@mongodb.com>
This is due expired GPG keys from Mongo. The issue can be solved by re-importing the key, as shown above.
- Install the correct version (4.4.15).
sudo apt install -y mongodb-org=4.4.15 mongodb-org-server=4.4.15 mongodb-org-shell=4.4.15 mongodb-org-mongos=4.4.15 mongodb-org-tools=4.4.15
Downgrading MongoDB
If you have installed a more recent version of Mongo, it may not work. To downgrade, add the --allow-downgrades flag to the command above.
A more recent version of MongoDB may be installed inadvertedly when running apt upgrade, to update system packages.
- Check the installed version.
Troubleshooting: Illegal instruction
If you get an error saying Illegal instruction (core dumped), then your MongoDB version is incompatible with your OS.
Make sure that the version you installed is at most 4.4.15, and downgrade if needed (i.e. add --allow-downgrades to the command above and run it again).
- Start and enable the MongoDB service at boot.
sudo systemctl daemon-reload
sudo systemctl start mongod.service
sudo systemctl enable mongod.service
sudo systemctl status mongod.service
- Hold updates of these packages.
# Prevent automatic updates.
# Otherwise, an update to, for example, `v4.4.30` will break the mongo installation and lead to "Illegal instruction" errors.
sudo apt-mark hold mongodb-org mongodb-org-server mongodb-org-shell mongodb-org-mongos mongodb-org-tools

# Check that the packages are on hold and current version is correct.
dpkg -l $(apt-mark showhold) | grep ^hi
MongoDB Configuration
Without further configuration, MongoDB accepts connections from the same host only (e.g. localhost and 127.0.0.1 addreses), and uses port 27017 by default.
For example:
If you need to change this, you can edit Mongo's configuration file. (e.g. at /etc/mongodb.conf or /etc/mongod.conf, it may vary), and tweak the network settings.
To bind to all IPv4 addresses, set bindIp: 0.0.0.0.
Install Node and NPM
Node and NPM are required to serve the web UI.
Compatible Node/NPM versions
The following versions have been tested to work: node v20.11.1 (and npm v10.2.4). Node version 22.15.0 also seems to work.
- Install NPM.
Old node versions
This may result, for example, in the installation of node and nodejs version v18.19.0, and npm version 9.2.0.
These are quite old and won't work as intended. The main incompatibility comes from the libraries needed to connect with mongo 4.15.
You can check the installed version by running node --version and npm --version.
- Install LTS NodeJS with the
ntool.
sudo npm install -g n  # Install the "n" tool globally.

sudo n lts  # Install and default to LTS node globally, including npm.

# Run this instead to install a tested version (see note above).
# sudo n 20.11.1  # Install and default to a particular node version globally, including npm.
- You now need to log out, and then log in again. Then
node --versionandnpm --versionto check that the updated versions have been installed.
Updated version check
After logging in again the version numbers printed by those commands should be higher.
OLA
The main repository tracks all the required repositories of pipettin as git "submodules", and uses git LFS for tracking CAD files, models, and other large files. You may need to install git lfs on your system to use them.
git with an SSH agent
Our repos are public, rely on igt-lfs, and submodules use HTTP/S connections. If you will be using encrypted SSH keys to push, we recommend setting up the ssh agent.
Download the main repository using git:
# Clone the main repo to your home directory.
git clone --single-branch -b master --depth 1 https://gitlab.com/open-la/pipettin-bot.git ~/pipettin-bot

# For the bleeding edge, use this instead:
#git clone --single-branch -b develop --depth 1 https://gitlab.com/open-la/pipettin-bot.git ~/pipettin-bot
To checkout the latest branches of all submodules, we include a helper script:
# Enter the repo and clone all submodules using a helper script.
cd ~/pipettin-bot
python code/scripts/clone.py
Alternative downloads
Alternatively, use git to download the repo and its submodules. Note that this leaves submodules in a detached state.
Writer UI
- Enter the GUI's GitLab repository (or clone it).
# Switch to the GUI's submodule in the main repo.
cd ~/pipettin-bot/code/pipettin-gui

# To clone it separately run:
# cd && git clone https://gitlab.com/open-la/pipettin-gui.git
# cd pipettin-gui
- Install the app's package dependencies using
npm.
# Barebones install, required to serve the pre-built app only.
npm install

# Full development install. This will take a while...
# npm install_dev
- Copy the default configuration to a new
config.jsonfile.
The config.json file
Configuration options in config.json are explained in the repo's docs: https://gitlab.com/open-la/pipettin-gui/-/blob/develop/doc/Config.md
- Edit the
config.jsonfile, replacing the IP address inHOST(e.g.127.0.0.1) with the current local network IP of the Raspberr Pi (otherwise the website may not be accessible).
# You can edit the file with the "nano" editor.
# Press Ctrl+X to exit the editor, and "Y" + "Enter" to save changes.
nano config.json
Example config.json
The config.json file may show the following content initially:
{
    "PORT": 3333,
    "HOST": "127.0.0.1"
}
Adjust the HOST parameter. You can leave the PORT as it is, or change it to your favourite number.
The IP address
Use the following command to show the Pi's current IP addresses. At least one of the printed addresses will be useful to connect to the GUI from another machine.
Using zeroconf
You might also try connecting through an mDNS/Zeroconf address, such as http://raspberrypi.local:3000 or http://olabot.local:3000 using your browser. It looks nicer and is simpler to remember, but it may not work on your particular LAN or PC without extra configuration (not covered here).
For this to work, the HOST address in the config.json file might need to be updated.
-
Write down the address set in the previous step. You will need it to configure the robot's controller later on.
-
If you have an external MongoDB instance, or have changed its default address above, you will need to edit the
.envfile as well.
# You can edit the file with the "nano" editor.
# Press Ctrl+X to exit the editor, and "Y" + "Enter" to save changes.
nano .env
Example .env
The .env file may show the following content initially:
DATABASE_NAME=pipettin
DATABASE_URI=127.0.0.1:27017
Adjust the DATABASE_URI parameter only if needed. You can leave the DATABASE_NAME as it is, or change it to your favourite DB name.
- Launch the GUI's development version.
-
Visit
http://<<yourpisip>>:3000on your web browser to open the app. -
Back on the terminal, and press
Ctrl+Cto stop the server.
Changing the UI's port
If you want to run the UI on a different port, edit the client/vite.config.js file. Replace the value in the port key to the value you want the UI to use. Port 80 will conflict with Mainsail's UI unless reconfigured, and requires elevated privileges to be used.
Development version
A pre-built version is updated every stable release, and is faster. It can be launched by running npm start instead. This is what the systemd unit uses to launch the app. You can use npm run dev to start the development version.
Piper controller
Run the commands below to install piper and its dependencies.
Python version 3.11 (or greater) is required. Check which version you are running with python --version, and update if needed.
You may need to install the venv module first:
# Install "python venv" if not already (python3.11-venv on Debian Bookworm).
sudo apt install -y python3-venv
Create and activate an environment:
# Create and activate the virtual environment on the home directory.
cd
python -m venv venv-piper
source ~/venv-piper/bin/activate
Note
The systemd unit for piper will need piper to be installed in a virtual environment at ~/venv-piper.
Switch to the controllers's directory:
Copy the config.yml file to Klipper's config data as piper.yml, and change any values you need to update (e.g. database name, socket address, etc.).
This file must reside at ~/printer_data/config/piper.yml, this is where piper's systemd unit expects it to be.
cp config.yml ~/printer_data/config/piper.yml

# You can edit the file with the "nano" editor (press Ctrl+X to exit the editor).
nano ~/printer_data/config/piper.yml
Disable dry mode
By default, the configuration file will make the controller operate in "dry mode". this means that the robot will not be commanded to move, and is meant as a debugging feature.
Make sure that dry is set to False in the configuration file if you want the robot to move.
Path to piper.yml
By default, the systemd unit for piper will look for the file at ~/printer_data/config/piper.yml. It is critical that the file resides at this location when piper is started through its systemd unit.
If the piper.yml file must be placed elsewhere for some reason, piper's systemd unit must be updated accordingly and reloaded.
nano ~/pipettin-bot/code/systemd.units/piper.service
sudo systemctl daemon-reload
sudo systemctl restart piper.service
Edit piper.yml from Mainsail
Because the file is stored at ~/printer_data/config/piper.yml, you can use Mainsail editor's instead to set piper's config options.
Install all modules and dependencies in the virtual environment:
# Install the package in editable mode, and its dependencies. It will take a while.
pip install -e .
Test that it starts correctly:
# Note that this will not connect to Klipper/Moonraker or the UI.
# It only tests that piper loads correctly.
python3 -m piper dry verbose ws_address='' sio_address=''
Back on the terminal, stop piper by pressing Ctrl+C, and deactivate its virtual environment:
Installing from git
You can also install Piper into a virtual environment directly from the git repo.
The catch is that you'll need to download an modify the config.yml file separately. You will also need to edit and reload the controller's systemd unit file, such that it uses the python executable from the virtual environment (e.g. to ~/piper_from_pip/bin/python) and to the configuration file you downloaded.
cd
python3 -m venv venv-piper
source ~/venv-piper/bin/activate

wget https://gitlab.com/open-la/pipettin-piper/-/raw/master/piper/config/config.yml

nano config.yml  # Edit the config. Press Ctrl+X to close the editor.

pip install git+https://gitlab.com/open-la/pipettin-piper.git

# Test that it starts:
python3 -m piper config_file='config.yml' ws_address='' sio_address=''
Systemd units
"Systemd units" are small configuration files that tell the system to handle the startup of the GUI's Node.js server, of the Python driver module, and other services at boot. The unit files can be found in the main repository, for reference.
Most of the units should be already installed and enabled at boot (i.e. Mongo, Klipper, Moonraker and Mainsail). You now need to install and enable units for the controller (piper), the GUI (pipettin writer), and others.
User units
We will setup units as "system" units. If instead you want to manage them as user units, first enable systemd lingering. Run this at least once as the pi user:
Then, in the commands shown elsewhere, omit using sudo, use sytemctl --user and journalctl --user-unit instead, and install units to ~/.config/systemd/user/.
Note
You may need to edit the piper.service and nodegui.service files, to adjust the paths that point to where the controller and nodegui were installed.
The systemd files and commands below are meant to work with the setup as detailed in this guide. They can be easily adapted to other setups with minor edits.
Before installing the units, you need to setup a polkit rule to allow restarting the piper unit as a regular user (i.e. without sudo) from the UI.
Create and open a new rule file for editing:
Add the following content, then save and exit:
polkit.addRule(function(action, subject) {
    if (action.id == "org.freedesktop.systemd1.manage-units" &&
        action.lookup("unit") == "piper.service" &&
        subject.user == "pi") {
        return polkit.Result.YES;
    }
});
You can now install the units by adding symlinks to /etc/systemd/system/. This has the advantage that any updates to the repo will apply automatically after a reboot.
# Controller service files.
sudo ln -s /home/pi/pipettin-bot/code/systemd.units/piper.service /etc/systemd/system/
sudo ln -s /home/pi/pipettin-bot/code/systemd.units/piper_update.service /etc/systemd/system/

# UI service files.
sudo ln -s /home/pi/pipettin-bot/code/systemd.units/nodegui.service /etc/systemd/system/

# The "host updater" unit keeps the UI's "config.json" file updated with the current IP.
sudo ln -s /home/pi/pipettin-bot/code/systemd.units/host_updater/ip-monitor.service /etc/systemd/system/
Now reload the units, such that systemd finds the changes:
# Reload the units.
sudo systemctl daemon-reload
# Check that the units are detected and are not in a "bad" state.
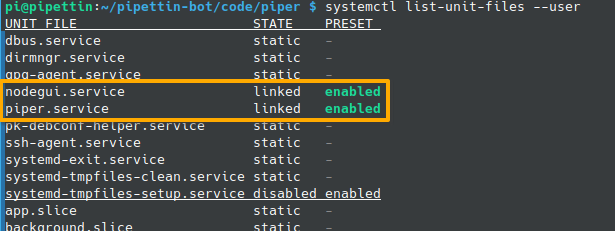
sudo systemctl list-unit-files
You should observe something similar to this:
Start and enable the GUI's unit:
# Note that you need a proper npm installation for Writer to work.
sudo systemctl enable --now nodegui.service
sudo systemctl status nodegui.service
Start and enable the controllers's unit:
# Note that you need a proper virtual environment setup for Piper to work.
sudo systemctl enable --now piper_update.service
sudo systemctl enable --now piper.service
sudo systemctl status piper.service
Optionally start and enble the host updater unit:
Tip
Handy bash aliases to restart the units can be added to ~/.bashrc by appending the following to it:
Service Manager
These services can be managed by the klipper stack, by allowing Moonraker to manage the piper_update and nodegui services. Including piper can be useful to restart the controller from Mainsail.
To do this, add the services to the ~/printer_data/moonraker.asvc file, to allow Moonraker to manage them.
echo nodegui >> ~/printer_data/moonraker.asvc
echo piper >> ~/printer_data/moonraker.asvc
echo piper_update >> ~/printer_data/moonraker.asvc
This configuration is required for Moonraker to correctly update Pipettin's software components.
To enable this feature, open moonraker.conf for editing, either through Mainsail or a terminal.
Add the following contents to the end of the file, and then restart Moonraker from Mainsail (top-right menu), to apply the changes.
Adding more software
There are optional software components that may require editing these files in the future.
If an [update_manager] section needs to set managed_services, you also need to allow this in with the moonraker.asvc file, as described above.
[update_manager piper_update]
type: git_repo
channel: dev
path: ~/pipettin-bot/code/piper
origin: https://gitlab.com/open-la/pipettin-piper.git
primary_branch: master
managed_services: piper_update
virtualenv: ~/venv-piper
requirements: requirements.txt
info_tags:
    desc=Piper Controller

[update_manager nodegui]
type: git_repo
channel: dev
path: ~/pipettin-bot/code/pipettin-gui
origin: https://gitlab.com/open-la/pipettin-gui.git
primary_branch: develop
enable_node_updates: True
managed_services: nodegui
info_tags:
    desc=Protocol Writer
If everything is correct, you should be able to follow the update process through Mainsail's updates widget.
Configuration
While the defaults should work out of the box, it is worth clarifying which configuration values must match.
- Server address: The URL and PORT of the Pipettin Writer backend and frontend must match, as explained here. No action is needed on your part under normal circumstances.
- The database IP address and PORT used by the UI must match the ones from your MongoDB instance. The defaults used in this guide already match each other.
- Database name: The backend uses a default database named
pipettin. The controller must use this database as well, and will do so automatically if configured to read from the UI's.envfile. This can be changed by updating the controller'sconfig.ymlfile.
Tip
You can set piper's config parameters by editing piper.yml using Mainsail's config editor.
Remember to restart the controller after saving any changes.
Example
In this example the initial value of database_name in the config.yml file was commented out, and another one added below to replace it.
database:
    mongo_url: 'mongodb://localhost:27017/'
    #database_name: 'pipettin'
    database_name: '2024-03-19-test'
The database name must match the initial value in the .env file. Look for the examples shown above.
Software updates
To update software components read the maintenance guide.
Additional Software
A few extra applications can be installed on the RPi, and be really useful.
Setup instructions can be found at the additional software setup guide.
For example:
- A small OLED display to show the machine's overal status and current IP address.
- Controlling the machine through Jupyter Lab or Jupyter Hub (served at ports
8888and8000, respectively). - A web frontend for system management: Cockpit (server at port
9090) - Locally serving this documentation, and/or the BOM.
Final checks
TO DO
- MCU connection.
- compatibility of node/mongo versions.
- Starting the GUI.
Software setup on a PC
You can run Pipettin on the three major operating systems.
Info
There are no system images for this setup.
Choose your poison:
- Linux: rather simpler instructions for Arch Linux and Ubuntu.
- Windows: achievable but rather complicated, specially the Klipper parts.
- Mac OS: should be possible, good luck!
Guides:
- To learn how to install the project's software on a Desktop PC (which replaces the Raspberry Pi entirely) visit here.
- The development guide might also be useful.
Next steps
Congrats! You've setup the software for your robot. That was tough!
You may continue with the Electronics Setup Guide, to install and configure the CNC firmware.
Navigation:
Previous: ← Assembly Guide | Next: Electronics Setup →