How to 3D print
Resin
Resin 3D printing uses a technology called stereolithography (SLA) or photopolymerization to create objects layer by layer using liquid resin that is cured by ultraviolet (UV) light or laser.
Materials and tools needed for printing
- Resin 3d printer: You must have a 3d printer specifically designed for printing with resin, sla or dla.
-
Resin: Different types of resin with specific properties. We select the right resin for the project, considering aspects such as resistance, flexibility, transparency and desired color, such as:
-
Standard resin
It is a 3D resin with medium strength, high printing speed and low shrinkage. It was created for 3D printing that requires a high degree of detail in the pieces. It has low viscosity, making the cleaning process of your 3D printer easier and faster.
- Industrial resin
Industrial photopolymers are materials with high mechanical properties, ideal for the most demanding applications. They are resistant to stress, as well as withstand blows and impacts, all without breaking or cracking. These capabilities allow them not only to serve as prototypes, but also to be used in tasks that require resistance and durability. We can find heat-resistant and calcinable resins.
- Flexible resin
These types of resins have rubber-like qualities and can have a hardness of around 80A. They are characterized by the ability to create resistant objects, capable of bending and compressing without actually deforming.
- Transparent resin
Transparent resins are very similar to standard ones. It is useful for creating small objects with a high level of detail, but with the added property that they are translucent and colorless. In addition to facilitating the subsequent sanding and painting process.
- High precision resin
Contains acrylate monomers to reduce volume shrinkage during the light-curing process. Ultra precision and high strength ensure that details are clearly displayed, with a delicate and smooth finish.
Resin Mixing Tips
- Work in a well ventilated area.
- Before mixing resins, make sure the original resin is well mixed. This can be done by hand or by placing the bottle in a glass. If the resin is not homogeneous before weighing, it is almost impossible to duplicate the results.
- Make sure that the weighing instrument is calibrated and accurate.
- Take into account that when mixing the resins, the monochrome (ej 405nm LCD) exposure times (seconds) are modified according to the amounts of resins in the composition.
- Unless you work with resins of the same color, it will be modified.
- Tests can be carried out to analyze the mechanical properties that we need such as flexibility, elongation, tension, etc.
Curing vat
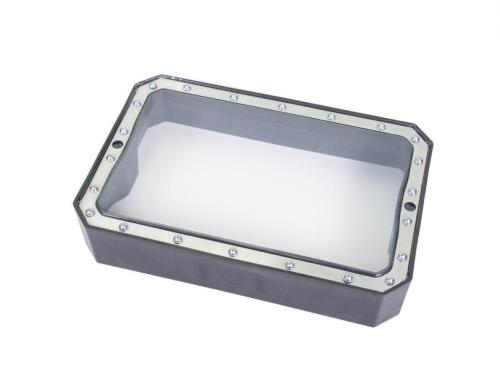
This key component in resin 3D printing acts as a translucent physical barrier between the liquid resin and the curing source.
It must endure the high temperatures required for resin curing and also show good mechanical resistance, since any failure could lead to severe leakage in the machine.
In terms of material, many desktop resin printers use FEP (Fluorinated Ethylene Propylene) films, a material known for its good chemical resistance and non-stick properties. It has somewhat become the standard for resin printing release films, although there are plenty of other suitable alternatives out there. Release films for resin 3D printers degrade over time, meaning that they need replacing once in a while. Dents and scratches caused by your spatula can also result in your prints not curing properly in places and may affect final print quality.
How to change the F.E.P?
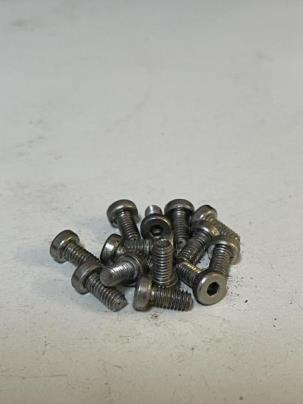
Remove the 14 screws in the lower part of the pan.
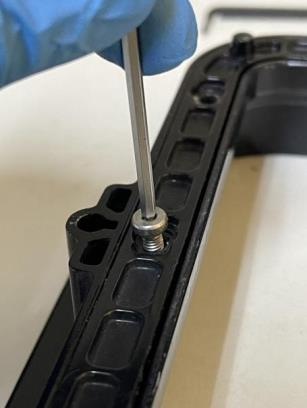
Remove the old and/or broken film from the pan.
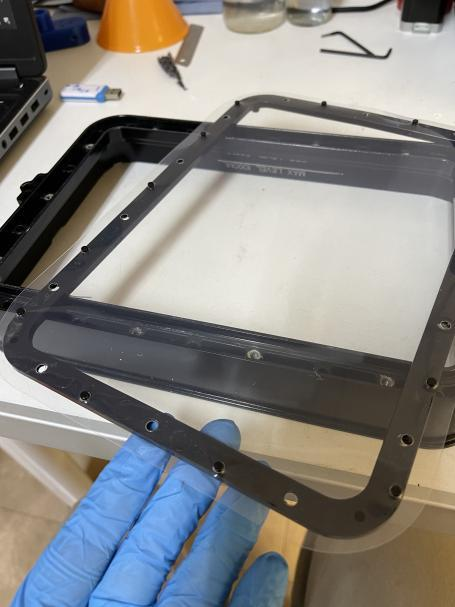
Then place the new film and screw the new film back on.
Info
When removing the build platform/printed parts, use the black plastic tray to protect the printer from resin drips. Always keep a pack of soft paper towels near the printer, so you can immediately wipe up any resin drips/spilled resin. To clean up resin gobs more effectively, use a cloth/paper towel dampened with isopropyl alcohol.
Post-printing process
After finishing a resin impression, the piece must be cleaned by applying Isopropyl Alcohol, in order to eliminate uncured resin remains and uncover cavities. Isopropyl alcohol can be applied directly to the piece with the help of a cloth or brush. You can also immerse the piece of resin in a container with isopropyl alcohol and shake manually or with the help of an ultrasonic pan.
For resin parts, it is ideal to finish the process with a cure in an ultraviolet light chamber to ensure its resistance and durability. The time spent must be taken into account, since if the exposure to ultraviolet light is too long, the piece could crystallize and become very brittle.

Here are some steps to follow to polish and shine prints:
- Initial sanding
Before beginning polishing, it is advisable to perform an initial sanding to remove the most obvious imperfections. Use medium grit sandpaper (approximately 180 to 220) and gently rub the surface of the printed part in circular motions. This will help smooth out any ledges or irregularities.
- Fine sanding
After the initial sanding, switch to a finer grit sandpaper, such as 320 or 400. Continue sanding the surface of the piece in circular motions, but this time with a little more pressure. The goal is to remove previous sanding marks and obtain a smoother surface.
- Ultra-fine sanding
For an even smoother finish, you can use ultra-fine grit sandpaper, such as 600 or higher. Again, sand the surface in circular motions, applying light pressure. This will help remove any visible sanding marks and prepare the surface for polishing.
- Polish with a polishing compound
Once the surface is well sanded, a specific polishing compound for resins can be applied. Apply a small amount of compound to a clean, soft cloth and rub the surface in circular motions. This will help remove any remaining sanding marks and brighten the piece.
- Final polish
After polishing, you can use a clean, soft cloth to apply a specific polish for plastics or resins. This will help enhance the shine and provide a shiny final finish to your 3D print.
Tip
We recommend that you post-process your 3D print to achieve the material properties:
Rinse your 3D printed object in IPA or (bio)ethanol for approximately 5 minutes.
Ensure that objects rinsed with IPA and/or (bio)ethanol are perfectly dry before continuing with post-processing.
Place rinsed parts in a well-ventilated area for at least 30 minutes, or use pressurized air for at least 2 minutes.
Leave your printed object in the Sun or cure your object in a high power curing chamber for approximately 20-30 minutes at 65°C.
The preferred curing wavelength is between 300-410 nm.
Cleaning and hygiene
To prevent disorder:
- Correctly level the printing platform
Incorrect leveling can cause resin spills and affect the adhesion of the layers.
- Properly configure the supports
They can trap and accumulate resin. Be sure to set up your supports properly and in an optimized way to minimize excess resin on your printed parts.
- Using a drip tray
Place a tray or container under the build platform to catch any excess resin that may drip during the build.This will prevent the resin from reaching other areas of the printer or surrounding surfaces.
- Clean up after printing finished
Carefully clean up any spills or excess resin on the printer and in the work area. Use paper towels or absorbent cloths to clean up any resin residue before removing the printed parts.
Printing Environment
Resin 3D printing is sensitive to ultraviolet (UV) light
You should print in a low ambient light environment or use a printer with a protective cover to prevent unwanted exposure to UV light.
Security
Always remember that despite the best efforts of brands, all liquid resins can pose a health risk.
- Wear protective equipment
Especially gloves, but also a mask, and goggles every time you work with resin. Avoid contact with skin, eyes and mouth.
- Accidents happen even to the most experienced users
If the resin does come in contact with the printer, table, or anything else, don't wait and clean it up immediately with paper towels and isopropyl alcohol (IPA).
- Disposal
Since we have already established that resin is toxic, it also follows that it can be harmful to animals and the environment. For this reason, you should not discard the resin without treating it first. This also applies to all other objects that have come into contact with the resin, including paper towels, disposable gloves, empty resin bottles, and washing solutions.
There is not much information available on the recycling of 3D printed products. Let's summarize how to deal with resin residues:
Uncured resin residues must be disposed of along with other hazardous chemicals at designated disposal sites.
The most practical solution is to simply leave the resin-filled pieces uncured in the sun for a few hours. The UV radiation should cure the resin into solid plastic scales. For washing solutions, these solid particles can be filtered before disposal. When fully cured, the plastic can be disposed of with standard household waste.
- Adequate ventilation
Liquid resin can give off toxic vapors during printing. Be sure to print in a well-ventilated area or use a printer with a filtration system.
-
Storage
-
Keep UV curable resins tightly sealed in their containers, out of direct sunlight and within the temperature recommended by the manufacturer.
- A small air space is needed to prevent the resin from spreading gel. Do not fill the resin container completely.
- Do not pour used uncured resin into new resin bottles.
- Do not store uncured resin in refrigerators used to store food and drinks.
In case of accidents you must know the safety precautions and first aid:
- Flush contaminated eyes or skin thoroughly with plenty of water for 15 minutes. Wash skin with soap and plenty of water or a dry cleanser if required.
- If skin irritation or rash occurs, seek medical attention immediately.
- If swallowed, do not induce vomiting. Seek medical attention immediately.
There are 3D printing resins that are formulated to be less toxic. A couple of good examples are ANYCUBIC Plant-Based Resin and eSun 3D Printer Bio-Resin.
According to the descriptions of these products, they are made from plant-based materials and do not contain harmful chemicals like BPA or benzene. They produce fewer odors, are non-irritating, and can be used with standard LCD-based 3D printers.
Filament

This process is called fused deposition modeling (FDM), and is probably the most common for home users. Stereolithography apparatus (SLA) is another technology that builds up the layers by flashing liquid resin with laser or UV light to harden it. And though SLA can produce incredible detail compared to FDM, resulting in prints with very fine details and smooth surfaces, it’s not as simple to use. We suggest sticking to FDM printers because they also offer more options, use a wider range of filaments, do not require a resin tank and are less sensitive to environmental factors such as humidity.
FDM filament comes in several varieties, but common ones are polylactic acid (PLA), acrylonitrile butadiene styrene (ABS) and polyethylene terephthalate (PETG).
Materials and tools needed for printing
- Resin 3d printer: You must have a 3d printer specifically designed for printing with resin, sla or dla.
- Filaments: It's important to choose both the right type of material and the right brand of that type, be it PLA, ABS or something more exotic. Here are the best of each of the five main filament types.
Filaments categories
PLA
Polylactic acid, or PLA, is the most common 3D printing filament and the easiest to use. Unlike most plastics, it's made from corn starches so it is non-toxic and, in theory, compostable, though it takes an industrial composter to do it. PLA uses a fairly low heat -- between 190 and 215 degrees Celsius (or between 374 and 419 degrees Fahrenheit) -- to melt the plastic for extrusion so it is the safest of the filaments. Almost every FDM 3D printer in the world can print PLA.
-
Pros:
- Non-toxic
- No awful smell
- Easy to use for a beginner
- Almost universally usable on any FDM printer
- Very cheap
-
Cons:
- Can require a lot of sanding
- Can easily warp in the sun or high-temp environments
- Can be brittle
ABS
ABS was one of the more common 3D printing filaments a few years back, and it still has some excellent uses. The biggest downside is its toxicity. You don't want to breathe in ABS as it melts, so you'll need a well-ventilated area.
That aside, it's sturdier and more heat-resistant than PLA. Most printers can print ABS, but you'll need a heated bed that can reach 100 degrees Celsius for best results, and protecting your printing job in an enclosed printer is a good idea.
-
Pros
- Can withstand a lot of heat
- Easy to sand
- Can be smoothed with acetone for a perfect shine
-
Cons:
- ts fumes are toxic so it requires ventilation
- It needs far more heat to print than PLA
- You will need an enclosure to get good results
PETG
PETG is chemically similar to the plastic that water and soft drink bottles are made of, and is a great alternative to ABS. It has the heat-resistant properties of ABS without the toxic fumes and can be sanded much like PLA. Most FDM printers that can print PLA can print PETG, though it takes a little more effort to get right.
-
Pros:
- Easier to print than ABS
- Holds a finish well
- Easier to store than other filaments
-
Cons:
- Requires high temps, which can damage printer parts over time.
TPU
TPU is a flexible material that can make cool rubbery models. Most people use it to 3D print phone cases, but more serious modelers often use it to create connectors or flexible hinges to other materials. It can be a difficult material to work with and is best used on a direct-drive 3D printer such as the Prusa Mk3s, rather than a Bowden printer like the Anycubic Vyper. A direct drive printer places the gears to move the filament directly on the print head, while a Bowden setup has them on the frame of the printer.
-
Pros:
- Flexible
- Won't warp in the heat
- Available in fun colors
-
Cons:
- Bad for making solid prints
- Hard to work with on budget printers
Exotics
Exotic filaments are ones that are outside the normal five choices, or interesting variations on those choices. They're often PLA mixed with carbon fiber or glow-in-the-dark chemicals and something that prints outside thenormal parameters of a 3D printer. You'll often need to upgrade your printer nozzle to use these. It's advanced stuff, but I wanted to show you my favorite glow-in-the-dark filament, which is fun to print with.
There are different types of filament sizes; 1.75mm filament is the most common. It's been adopted by most of the 3D manufacturers in the world and if you have an entry-level printer, it's likely to run on 1.75mm filament.
Some 3D printers still use the thicker 3mm style but usually it's for more expensive printers and more difficult to use them.
Change of filament
One of the first things you’ll want to do with a new 3D printer is learn how to change the filament. This step-by-step guide teaches you how to swap filament spools without damaging or clogging the extruder nozzle.
Turn the printer on
- Set the desired temperature of the hot end
In the menu, select Temperature->Nozzle and set a temperature maybe around 200 degrees, as we need the filament in the extruder to melt.Click to accept the temperature, and now on the main info screen we can see the extruder heating.The bed doesn't heat up as we have set the temperature only on the extruder nozzle.
For example, imagine you are printing with PETG, and you want to switch to PLA filament. Because PETG melts at a higher temperature, if you were to set the temperature for PLA, the PETG might not fully melt and may not be fully purgedduring the filament change. This is the most common mistake people make when changing filaments.
- Remove the old filament
Once the set temperature has reached, we would squeeze the extruder lever, which generally holds the filament and gently pull the filament out.
The end of the filament has melted and that's what has allowed us to pull it out of the extruder as visible on the end.
Do Note, don't try to pull the filament out of the extruder until it has heated properly, give it a few seconds, and once it reaches its optimum temperature it would just slide out. If you’re not careful you could damage the extruder nozzle .
After you’ve removed the filament, consider blowing some compressed air into the extruder gear to remove any plastic flakes that might have accumulated.
- Prepare and load the new filament
Inspect the new filament. Make sure there aren’t any bends, weak spots, or gouged areas. You want the filament to look and feel pristine. Fingertips arevery sensitive, so run your fingers along a few feet of the filament to see if you can feel any flaws. If you do, cut that part of the filament off and discard it.
While you’re inspecting the filament, make sure it doesn’t unwind from the spool. You don’t want the filament to get crossed or tangled.
To prepare the new filament, use a wire snip or razor blade to cut the filament at a 45-degree angle. It should feel sharp at the tip. This ensures that it easily slides into the printer. Put the filament spool on the spool holder before you continue.
If your printer has a menu option for loading filament, find it, and follow the on-screen instructions. If it does not and is a Bowden printer, make sure you use the manual release as you thread the new filament through the Bowden tube
- Test new filament
The filament is now at the nozzle, but it will not start printing with it as you would have remaining filament from earlier within.
This old filament needs to be purged from the nozzle, and for this, we have a handy option named “Change Filament” found under Prepare-> Change Filament. If you cannot find this option in the menu, open the settings menu and scroll to Move Axis -> 1 mm -> Nozzle -> 15 to 20 instead.
Keep an eye on the colour of the filament being purged, when it changes colour the new filament has taken its place.
Printing
Once you’ve figured out your filament, you’ll need to choose the proper 3D software, called a “slicer.” This takes a 3D file, and tells the printer how to print it.It does this by slicing it into the horizontal layers the printer lays down.
Some of the most popular are Cura from Ultimaker, PrusaSlicer from Prusa Research and Simplify3D. Cura is popular among beginners because it’s got a user-friendly interface and a wide range of customization options. It’s also open-source and thus free.
Parameters
Then you have to adjust the preferences to print, printers have different types of nozzle size, the most common ones are 0,4mm. There is a lot of different parameters that can change depending on the type of print that you want to make, here is an example of a normal configuration:
- Printing temperature: 200 ºC
- Print bed temperature: 60ºC
- Speed: 50mm/s
- Layer height: 0.12mm
- Retraction: 6 mm at 25 mm/s
- Filling: 20%
- Initial layer speed: 20 mm/s
- Initial fan speed: 0%
Temperature
Hotend
One of the most important settings is the temperature. If it is not adjusted correctly, it can cause problems with overextrusion or underextrusion, curling, or the appearance of drops or imperfections on the surface. Most PLA filaments require a temperature of at least 180°C for proper extrusion and can withstand up to 220°C before overextrusion becomes a problem.
Ideal temperatures change between different materials (ABS: 220-250°C, PETG: 220-245°C), and the brand of filament can also make a difference. When testing a new filament, it is a great idea to print a temperature tower. In general, we consider 200°C to be a good average temperature for PLA filaments.
Endbed
This parameter also depends largely on the material you use. PLA doesn't actually require heating the print bed (but it still always helps), especially if you use something for adhesion to the bed, like painter's tape, shellac, or glue. Ideally, the bed temperature should always be higher than room temperature.
The bed temperature for ABS materials should be noticeably higher than PLA, and would be around 110°C, PLA 50° and PETG 75°.
Speed
To calculate the perfect print speed, you must find the balance between total print time and the quality of a part. As print speed increases, print quality decreases. This is because if the hotend moves slowly when creating the finer details, nothing is more likely to fail. On the other hand, no one wants to have to wait two weeks to complete a print.
On average, most users print PLA at speeds between 45mm/s and 65mm/s. Layer heightWe could refer to the height of the layers as detail, and the result would be the same. If we divide the height of the layers in half, the resolution of the print doubles. Reducing the height of the layers by half means making twice as many layers for the same print, and, conversely, a higher resolution means noticeably slower printing times. Finding the perfect combination between printing speed and layer height is essential to achieve good quality prints in shorter times.
Height
The height of the layers can be broken down into "magic numbers." These magic numbers are basically those layer heights that work best for a given printer. For Ender 3 models, the magic numbers are in 0.04 mm increments (e.g. 0.08, 0.12, 0.16, 0.20, 0.24 mm…).
This is simply because the Ender 3's Z-axis stepper motor raises the hotend by 0.04 mm with each step.
- Slow printing, greater detail: 0.12 mm
- Fast printing, smallest detail: 0.20 mm
Filling
Infill influences both the hardness and weight of a print. There is no such thing as a “perfect” fill setting, as it depends entirely on the intended purpose of the piece. For decorative, lightweight prints, you can decrease the infill to 5% or 10%. This will reduce printing time and make the piece noticeably lighter.
For functional prints, you'll probably want to apply a higher infill setting to achieve harder, more durable pieces. Anything above 50% will be adequate, and there may even be parts that require 100% infill.
Post processing
- Support removal
Is the most basic form of post-processing. Usually, it doesn’t require much effort unless there are supports in tight corners or other hard-to-reach places. Depending on the material, supports can be insoluble or soluble, meaning they will dissolve in water or other liquids.
- Sanding
After printing, a part might have a few blobs left on its surface or some nasty marks remaining after you’ve removed supports. The ideal way to remove such blemishes is by using sandpaper.
It’s always best to start with low-grit sandpaper (150-400) and move towards higher-grit sandpaper (up to 2,000) in a few stages of sanding.
- Welding
If you’d like to 3D print a large object using ABS, but the build volume of your 3D printer is too small, welding is the perfect solution.
In FDM 3D printing, welding refers to connecting ABS parts using acetone. Acetone has the ability to melt ABS, so this means that you can join ABS parts using acetone welding.
The process is fairly simple but requires a steady hand. Apply a little bit of acetone onto the part you’d like to “glue”. This will slightly melt the plastic, and at that moment, attach the other part to the melted edge to weld them together securely.
- Gluing
While welding is a great method for merging multiple 3D printed parts, it’s only possible with parts printed in ABS. Luckily, 3D prints made with other materials can still be joined by gluing. Similar to welding, glue is generally used when you can’t print something in a single piece due to the dimensional constraints of the printer. PLA and PETG are examples of materials that can easily be glued together using custom products like 3D Gloop! or bonding agents like super glue.
- Security
When a 3D printer works, it emits fumes that contain particles of plastic, metal, and other materials. 3D printer fumes comprise two categories of ingredients: UFPs and VOCs.
- Ultrafine particles (UFPs) are tiny and can cause inflammation inside the eyes and nasal areas when you're not wearing proper safety gear.
- Volatile Organic Compounds (VOCs) include a wide variety of compounds emitted from certain solids and liquids. Some of these are not harmful and have a sweet smell, while others can have negative short- or long-term health effects, according to an EPA article on indoor air quality. You should take care to avoid long-term exposure to VOCs as well as UFPs.How to Protect Yourself From 3D Printer Fumes You can take several measures to reduce the number of 3D printer fumes. These include:
- Ensure proper ventilation: You can do this by opening windows, using a fan to circulate air, or installing an exhaust system.
- Use a respirator mask: Some masks have special filters for protection against specific materials such as nylon and polycarbonate.
- Use safer materials: ABS produces a lot of toxic fumes and should be avoided. You should consider choosing a 3D printer filament that produces fewer toxic fumes like PLA and PETG.
- Clean your printer regularly: Clean your printer regularly to prevent the buildup of dust and other particles that could become airborne during prints.
- Enclosures: Install a 3D printer enclosure around your 3D printer to help contain the fumes and keep them away from other people in the space.
- Wear protective gear: Wear safety glasses to protect your eyes from particles released during printing and gloves to stay safe from sharp edges on printed objects.
By taking these steps, you can ensure that 3D printing is safe for you and your family or coworkers. If you expose yourself to hazardous levels of these fumes, you should seek medical attention from a qualified professional.
Tips
- Play with the orientation of the model: Depending on the form of the model, different types of orientations when it's time to print can make it faster or use less plastic.
- Remember to hollow your design: Sometimes when making the model we forget to make it hollow, so it's gonna print all the models with 100% fill.Changing the model can help to make it more cheap and save a lot of time when it's time to print.
- Choose the material to adapt to your project: You might not want to use the same materials, 3D printing techniques, or finishing for a prototype and for a finished product. Maybe you need to use a rubber-like material, something slightly flexible, or a rigid material resistant to stress
Happy printing!