Network information on a small OLED Display
OLED Display for the Raspberry Pi
Info
- Communication channel (e.g. Discord forum thread): https://discord.com/channels/1042462799772782613/1263124370591842347
- Task tracking for the objective (e.g. GitLab issues): https://gitlab.com/pipettin-bot/pipettin-bot/-/issues/323
Overview
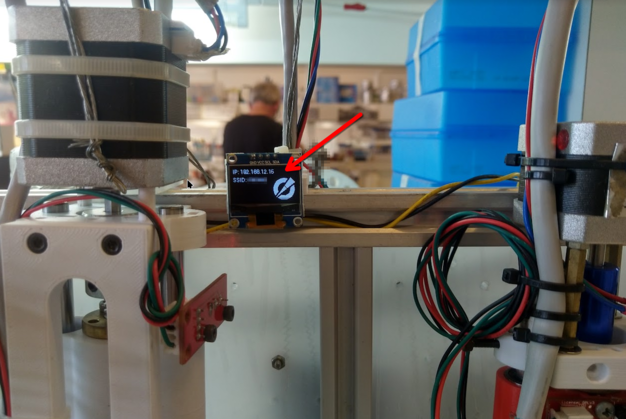
This little gadget helps find the robot's IP on a new network, with dynamic IP assignments.
The project's logo is shown, and rotates endlessly, indicating that the Raspberry Pi is largely operational.

Usage
Read on the display:
- The IP address of the Raspberry Pi on its wireless network interface (i.e.
wlan). - The name of the current WiFi network it is connected to (relies on
iwgetid). - Filled squares are drawn for each system service that is working correctly. They are drawn "empty" if they are failing or missing.
- The logo of the Pipettin project, rotating continuously on the lower-right corner, to indicate activity.
If any of these are missing, or if the display is off, something important is not working. Thanks to the display, you will know, and do something about it (like rebooting). 😄
Pins and I2C address:
- The I2C address is expected to be
0x3C. - The reset pin is expected to be
D4.
Caveats and Limitations
I'm not sure what happens.
Assembly
Parts:
- 128x64 OLED SSD1306 display.
- 4 jumper wires, female-to-female.
- 3D-printed case.
Steps:
- Measure the width of the display module with calipers, and print the case that matches your display. There are a few 3D-model variants available for download in the BOM page.
- 3D-print the case and place the display in the case.
- Add a pair of 2020 drop-in nuts and screws to the case.
Proceed to installation.
Installation
There is a stepwise guide for the mini display: https://stepwisedocs.com/docs/projects/olas-mk3-4/guides/mini-display-45
Briefly:
- Attach the display where you can easily see it. As long as the cable is long enough and does not get in the way, it can be placed anywhere.
- Connect the 128x64 monochrome OLED to the Raspberry Pi's I2C pins, on the GPIO header.
- A wiring diagram is available here: https://learn.adafruit.com/monochrome-oled-breakouts/python-wiring#adafruit-0-dot-96-128x64-oled-display-stemma-qt-version-i2c-wiring-3069572
- Note: there is an error on that guide at the time of writing. The GND pin from the display is connected to GPIO17 on the pi instead of GND above.
- Install the required software.
- You should see the display power up and show stuff after a few seconds of booting, and must work across reboots.
Interactions
- The display is mounted on the side of a 2020 extrusion of the structural frame.
- It connects to the GPIO header on a Raspberry Pi.
- The Raspberry Pi must be running a python program, which operates the display, and draws system information on it.
Maintenance
The display requires no maintenance, but it might degrade over time.
For example, it might lose brightness or show "gohsting" in regions of the display where the pixels are always on.
If this becomes an issue, replace the display module.
Design
This display was thought as a simple method that can be used to check if the robot is connected to the network, and which of its services are online.
The display module is cheap and ubiquitous.
It was not chosen for readability, as it will not likely be used more than a few times (e.g. only during setup and troubleshooting).
Models
Source files: https://gitlab.com/pipettin-bot/pipettin-bot/-/tree/master/models/MK3/electronics
Look for DISPLAY-BASE.FCStd.
Software
Source files here: https://gitlab.com/pipettin-bot/pipettin-bot/-/tree/master/code/mini_display
Setting up I2C on the Pi
I had Ubuntu on this Pi, here is a guide on enabling I2C in Ubuntu.
lsb_release -a
No LSB modules are available.
Distributor ID: Ubuntu
Description:    Ubuntu 20.04.6 LTS
Release:        20.04
Codename:       focal
Use raspi-config to enable I2C.
sudo raspi-config  # Enable I2C under "Interface Options", then exit the app.

# Check that I2C shows up enabled too:
cat /boot/firmware/config.txt | grep i2c
cat /boot/firmware/syscfg.txt | grep i2c
cat /boot/firmware/usercfg.txt | grep i2c
For an I2C speed boost, see: https://learn.adafruit.com/monochrome-oled-breakouts/python-setup
sudo nano /boot/firmware/config.txt
# Under the "[all]" section at the end of the file, add:
# dtparam=i2c_baudrate=1000000
Add pi to the relevant groups, reboot and check:
sudo usermod -a -G gpio pi
sudo usermod -a -G i2c pi
sudo usermod -a -G dialout pi

sudo reboot # Reboot and reconnect.

groups # Should list all groups.
ls -l /dev/gpio*  # Check.
Install dependencies:
sudo apt install -y python3-dev python3-pil python3-numpy python3-rpi.gpio rpi.gpio-common
sudo apt install -y i2c-tools
Check that I2C is enabled:
sudo i2cdetect -y 1  # Works, shows "3c" somewhere in the grid.
sudo i2cdetect -y 0  # Fails.

sudo ls -l /dev/i2c*
Install python dependencies
See: https://learn.adafruit.com/monochrome-oled-breakouts/python-setup
System packages:
sudo apt install -y python3-pil python3-numpy
sudo apt install -y python3-dev python3-netifaces # installs python netifaces
python -m venv ~/venv-display --system-site-packages  # makes netifaces available in the venv
Python packages:
source ~/venv-display/bin/activate
python3 -m pip install --upgrade pip
pip3 install pillow # --upgrade # pillow==9.5
pip3 install psutil
pip3 install adafruit-circuitpython-ssd1306 # installs python digitalio
deactivate # Cleanup.
Start the program
There are three units, that execute sequentially on boot:
- Splash: shows the pipettin logo for 3 seconds on boot.
- Updater: updates the python virtual environment required by the main program.
- Main program: collects system data and draws it on the display.
Install, enable, and start the systemd units for the mini display:
# For the mini OLED display.
sudo ln -s /home/pi/pipettin-bot/code/systemd.units/mini_display.service /etc/systemd/system/
sudo ln -s /home/pi/pipettin-bot/code/systemd.units/mini_display_prepare.service /etc/systemd/system/
sudo ln -s /home/pi/pipettin-bot/code/systemd.units/mini_display_splash.service /etc/systemd/system/

# Reload the units.
sudo systemctl daemon-reload

# Enable and start the splash unit.
sudo systemctl enable mini_display_splash.service

# Enable and start the updater unit.
sudo systemctl enable --now mini_display_prepare.service
sudo systemctl status mini_display_prepare.service

# Enable and start the main unit.
sudo systemctl enable --now mini_display.service
sudo systemctl status mini_display.service
Updates
TO-DO.
Development
- Document type: Technical documentation
- Audience: Developers
- Content: Development flow and tools (e.g. IDEs, EDA, or CAD software), file formats, and guidelines used to develop the project. Description of setups for development and testing. Detailed description of the hardware modules and software, and corresponding source files. Tutorials and examples for how to get started or adding new modules.