Maintenance
WIP
This page is missing content for:
- Hardware upgrades.
- Troubleshooting known problems. In progress
- Repairing common failures. In progress
- Replacement parts.
- Maintenance frequency.
Maintenance Guide
Maintaining your robot is simple. Here's what you'll need:
- Time: Set aside some time inspect the machine, clean it, and add lubrication if needed. Think of it as a small investment that keeps your bot running smoothly.
- Replacement parts: Keeping a small stock of commonly replaced parts will help (e.g. belts, rods, screws, and nuts), especially with upgrades.
- A commitment to care! 😊
Frequency
Note: This section is missing content.
Subassemblies
Many technical documentation entries have specific maintenance information:
- Baseplate maintenance.
- Structural Frame maintenance.
- Backpanel maintenance.
- Motion system maintenance.
- Tool-changer maintenance.
- Electronics maintenance.
- Micropipette maintenance.
Lubrication
Lubrication is an important step in maintaining Pipettin Bots, as it helps to:
- Reduce friction
- Prevent wear and tear
- Dissipate heat
- Protect against corrosion
- Improve sealing surfaces
Parts such as lead screws, nuts, and gears need to be re-lubricated occasionally.
Tip
- If you are changing between different types of lubricant, we recommend cleaning away the original lubricant with isopropyl alcohol first.
- Clean the parts before lubricating them. This will help to remove any dirt or debris that could interfere with the lubricant.
- Be careful not to over-lubricate, as this can attract dirt and dust.
Here are some specific lubricants that you can use:
- White lithium grease is a good general-purpose lubricant for metal-on-metal contacts (e.g. leadscres and brass nuts). It is relatively inexpensive and easy to find.
- Silicone grease is a good choice for lubricating metal-on-plastic contacts, and to help with air-tight sealing inside the micropipettes.
Instructions to lubricate 3D-printers or similar CNC machines: https://www.youtube.com/watch?v=Yn6FFd1ry9g
Belt tension
The MK3 achieves motion using a system of pulleys and belts as explained here. For optimal operation it is important that the belt tension is maintained at the correct level. Excessive belt tension will contribute to stalling and premature wear. Insufficient belt tension can also lead to loss of steps and inaccurate motion.
Here are a few points:
- Do not overtighten the belt.
- Tighten the belf sufficiently. It must not be loose.
- Check belt tension every few weeks or months.
All axes have way to adjust the position of the motors until the belts they drive are tight. The main X and Z belts can also be adjusted by pulling from the belts on a free end, and anchoring it while tight.
Since belts settle and stretch over time, we recommend evaluating belt tension and adjusting it as necessary. This can be done "by feel" or with a device that can measure audible frequency in hertz (e.g. a guitar tuner).
Manual method
Adjust the tension until if feels right, by plucking the belt and/or pushing it near a pulley.
It works if you happen to have good intuition for it (which implies having made mistakes).
Assisted method
Instructions to adjust belt tension using a guitar string tuning app.
Follow the instructions here: https://www.youtube.com/watch?v=tg9Co_1MyZo
Motor current
It may be wise to check on the temperature of the motors to adjust their current limits.
If you find that they are skipping stepps on heavy load, and are not too hot, consider increasing the limits
The procedures are described in the electronics guide.
Software updates
Managed Updates
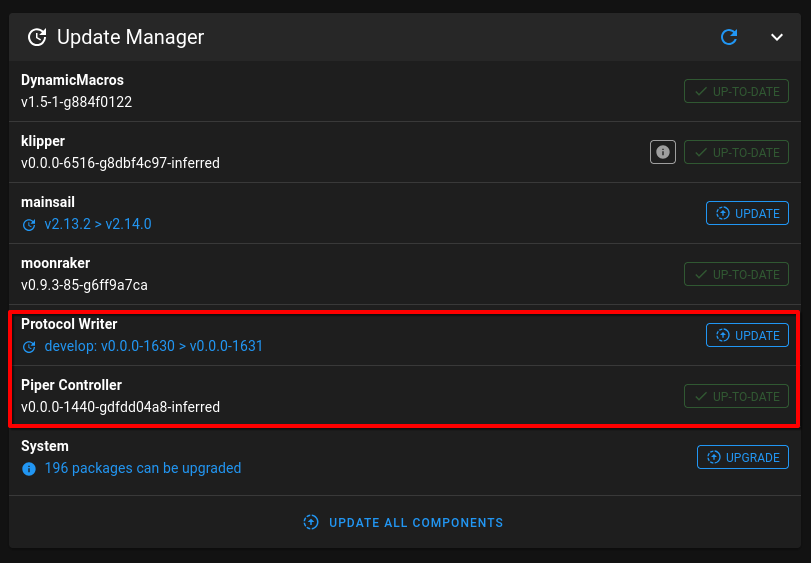
The easiest way to update components is through Mainsail, klipper's web UI.
After enabling Moonraker updates, you should see the following entries in the updates "widget", at Mainsai's Machine tab:
To update a component, click on its blue "update" button, and carefully read the instructions.
Advanced Update
To update to the latest versions of the submodules, run the following commands.
# Enter the repo's directory.
cd ~/pipettin-bot

# Optionally, configure git to auto-update submodules on every git pull.
git config submodule.recurse true

# Pull the latest commit of the main repo and submodules.
git pull
Troubleshooting: Nothing happened
These commands will have no effect if you just followed the guide above.
Troubleshooting: Version control conflicts
Any changes to the configuration files may cause version control conflicts, and prevent you from updating through git pull.
In this case, you can try backing up the files, then use git restore someconfig.yml to checkout the original versions, then git pull, and manually migrate the modified values from your backup.
To update the submodules beyond the commited versions of the submodules, run the following.
# Fetch latest submodules (optionally).
git submodule foreach --recursive git checkout -
git submodule foreach --recursive git pull
Bleeding edge
The latest versions may contain untested features, or be incompatible with your current setup. Excercise caution.
Finally, reload the systemd user units, as the may have changed, and restart everything:
# Reload the user's units.
sudo systemctl daemon-reload

# Restart components.
sudo systemctl restart nodegui.service
sudo systemctl restart piper.service
# ...or just reboot.
Use Mainsail instead
If you installed "Pipetting OS" you can (and should) update most modules through Mainsail instead.
This will also properly install the updated modules to their respective virtual environments, which the git commands below don't do.
Hardware upgrades
Note: This section is missing a proper tutorial.
Brief summary of changes:
- MK3: Reference build.
- MK3.2: Minor fixes and improvements.
- MK3.3: Updated X-axis plate, added hall-effect endstops to X and Z axes.
- MK3.4 (WIP): Replaced the tool-changer's transmission belt with a nylon coated steel cable and pulley.
Testing
Note: This section is missing content.
Troubleshooting
Overheating
Stepper motors generate heat as they operate, and if the heat is not properly dissipated, it can cause the motor to stall or overheat. This can be caused by:
- Dirt in the motion system.
- Excessive ambient temperature.
How to Fix: Keep you machine maintained and clean. Check the manufacturer's recommendations for the maximum RPM and operating time of your CNC machine. Place your machine in a ventilated workspace.
Power Supply Issues
Issues with the power supply can show up in a number of ways, and can be due to insufficient voltage and/or power ratings.
How to Fix: Ensure that the correct power and voltage supply is used, and that the supply is still capable of producing the required current at the nominal voltage.
Vibration issues
Excessive vibrations can cause fasteners to become loose, uncomfortable noises, and calibration issues.
How to Fix:
- Look for loose parts or fasteners.
- Manually operate each axis of the machine, trying different speeds, lowering the speed until no vibrations are found.
- Increase the microstepping setting through the firmware's configuration.
- Considering attaching side panels to the open sides of the aluminium structure to stiffen it and dampen vibrations. Adding weight to the assembly, ensuring proper contact with the supporting surface, or rubber feet can also help.
Tool-changer Problems
Occasionally, you may face challenges with the tool changer:
- The remote actuator may jam.
- The leadscrew on the headplate may bind on tools, dropping them on the baseplate.
How to Fix: re-calibrate the remote's limits and tool post coordinates.
Mechanical failures
Note: This section is missing content.
To-Do: Do tests on Pipettin Bot to learn more about its common failures.
All you actually need to know, as seen at R-bloggers.
Now seriously, most parts can be replaced by 3D-printing new ones.
A pipette's tip holder is the only plastic part that can break and will need a CNC'ed replacement, but gluing cracks or breaks may be viable (we haven't tried).
Replacement parts
Note: This section is missing content.