Pipette calibration: Procedures
Volumetric calibration
Note
The information here is derived from empirical calibration, and may not be theoretically accurate.
Procedures here can be considered drafts.
Related issue: https://gitlab.com/pipettin-bot/pipettin-grbl/-/issues/44
Standard micropipettes are meant to be used by hand, but we use a stepper to drive them, which needed corrections to aspirate and dispense the correct solution volumes.
The main takeaway is that pipetting less than 20uL with a p200 will get you into surface-tension-trouble-land (but the effect can be corrected for 1% error).
Overall Procedure
Volume calibrations were performed gravimetrically, using two pipetting modes:
- Serial: In this mode, the robot transfers the same volume (X) to N different tubes. This is done in a single loading movement, followed by
Nunloading movements. - Direct: In this mode, the robot attempts to transfer a specific volume (X) in a single movement. This equivalent to the serial mode with
N=1.
Prepare Materials:
- Distilled water at room temperature
- Clean and empty tubes
- Scale with sufficient accuracy for the pipette's volume range
piperprogram configured with the pipette and robot
Define Target Volume:
- Select a tip size and target volume within the pipette's operating range.
Initial Calibration:
- Perform an initial calibration of the pipette without any corrections applied. This will establish a baseline for comparison.
Iterative Correction and Testing:
- Enable one correction parameter at a time. Start with a small correction value.
- Perform a series of pipetting operations (serial or direct) using the chosen target volume.
- Weigh the dispensed liquid in each tube using the scale.
- Calculate the average dispensed volume and standard deviation.
- Compare the results to the target volume and acceptable tolerances.
- Adjust the correction parameter value iteratively, repeating steps 4.2 to 4.5 until the dispensed volume is within the acceptable tolerance.
Document Results:
- Record the calibrated correction parameter value and the corresponding accuracy and precision measurements.
Notes:
- Use a statistically significant number of repetitions for each calibration step to ensure reliable results.
- Consider the pipette's specifications and the intended application when defining acceptable tolerances.
- Document all calibration procedures and results for traceability and quality control purposes.
The calibration procedure generally consists of the following steps:
- Add a starting volume to
Ntubes (e.g. 100 uL) and weigh them.- This will remove any effect due to the tubes being dry on the first dispense.
- Have the robot transfer distilled water to the tubes (using one of the pipetting modes).
- You may want to start by calibrating in direct mode (
N=1), measuring the mass of bot source tubes and target tubes. This will be very informative. - After calibrating correction parameters, move on to serial mode (e.g.
N=5). - The target volume depends on the tip you're using; for p200 tips in serial mode we used 30 uL. For direct mode, use a larger volume (e.g. 100 uL).
- You may want to start by calibrating in direct mode (
- Weigh the tubes with the liquid added by the robot.
- Correcting for accurate dispensing may be enough for you, but measuring the weight of the source tubes will reveal inaccuracies in aspiration.
- Try doing this immediately to minimize evaporation effects.
- Calculate the difference between the final and initial weights of the tubes.
- Repeat the procedure at least 3 times.
- Plot the results of the calibration sessions.
By following this procedure and carefully adjusting the correction parameters, the accuracy and precision of the piper program can be optimized for specific pipetting tasks.
Interpreting Results
You will observe deviations such as these:
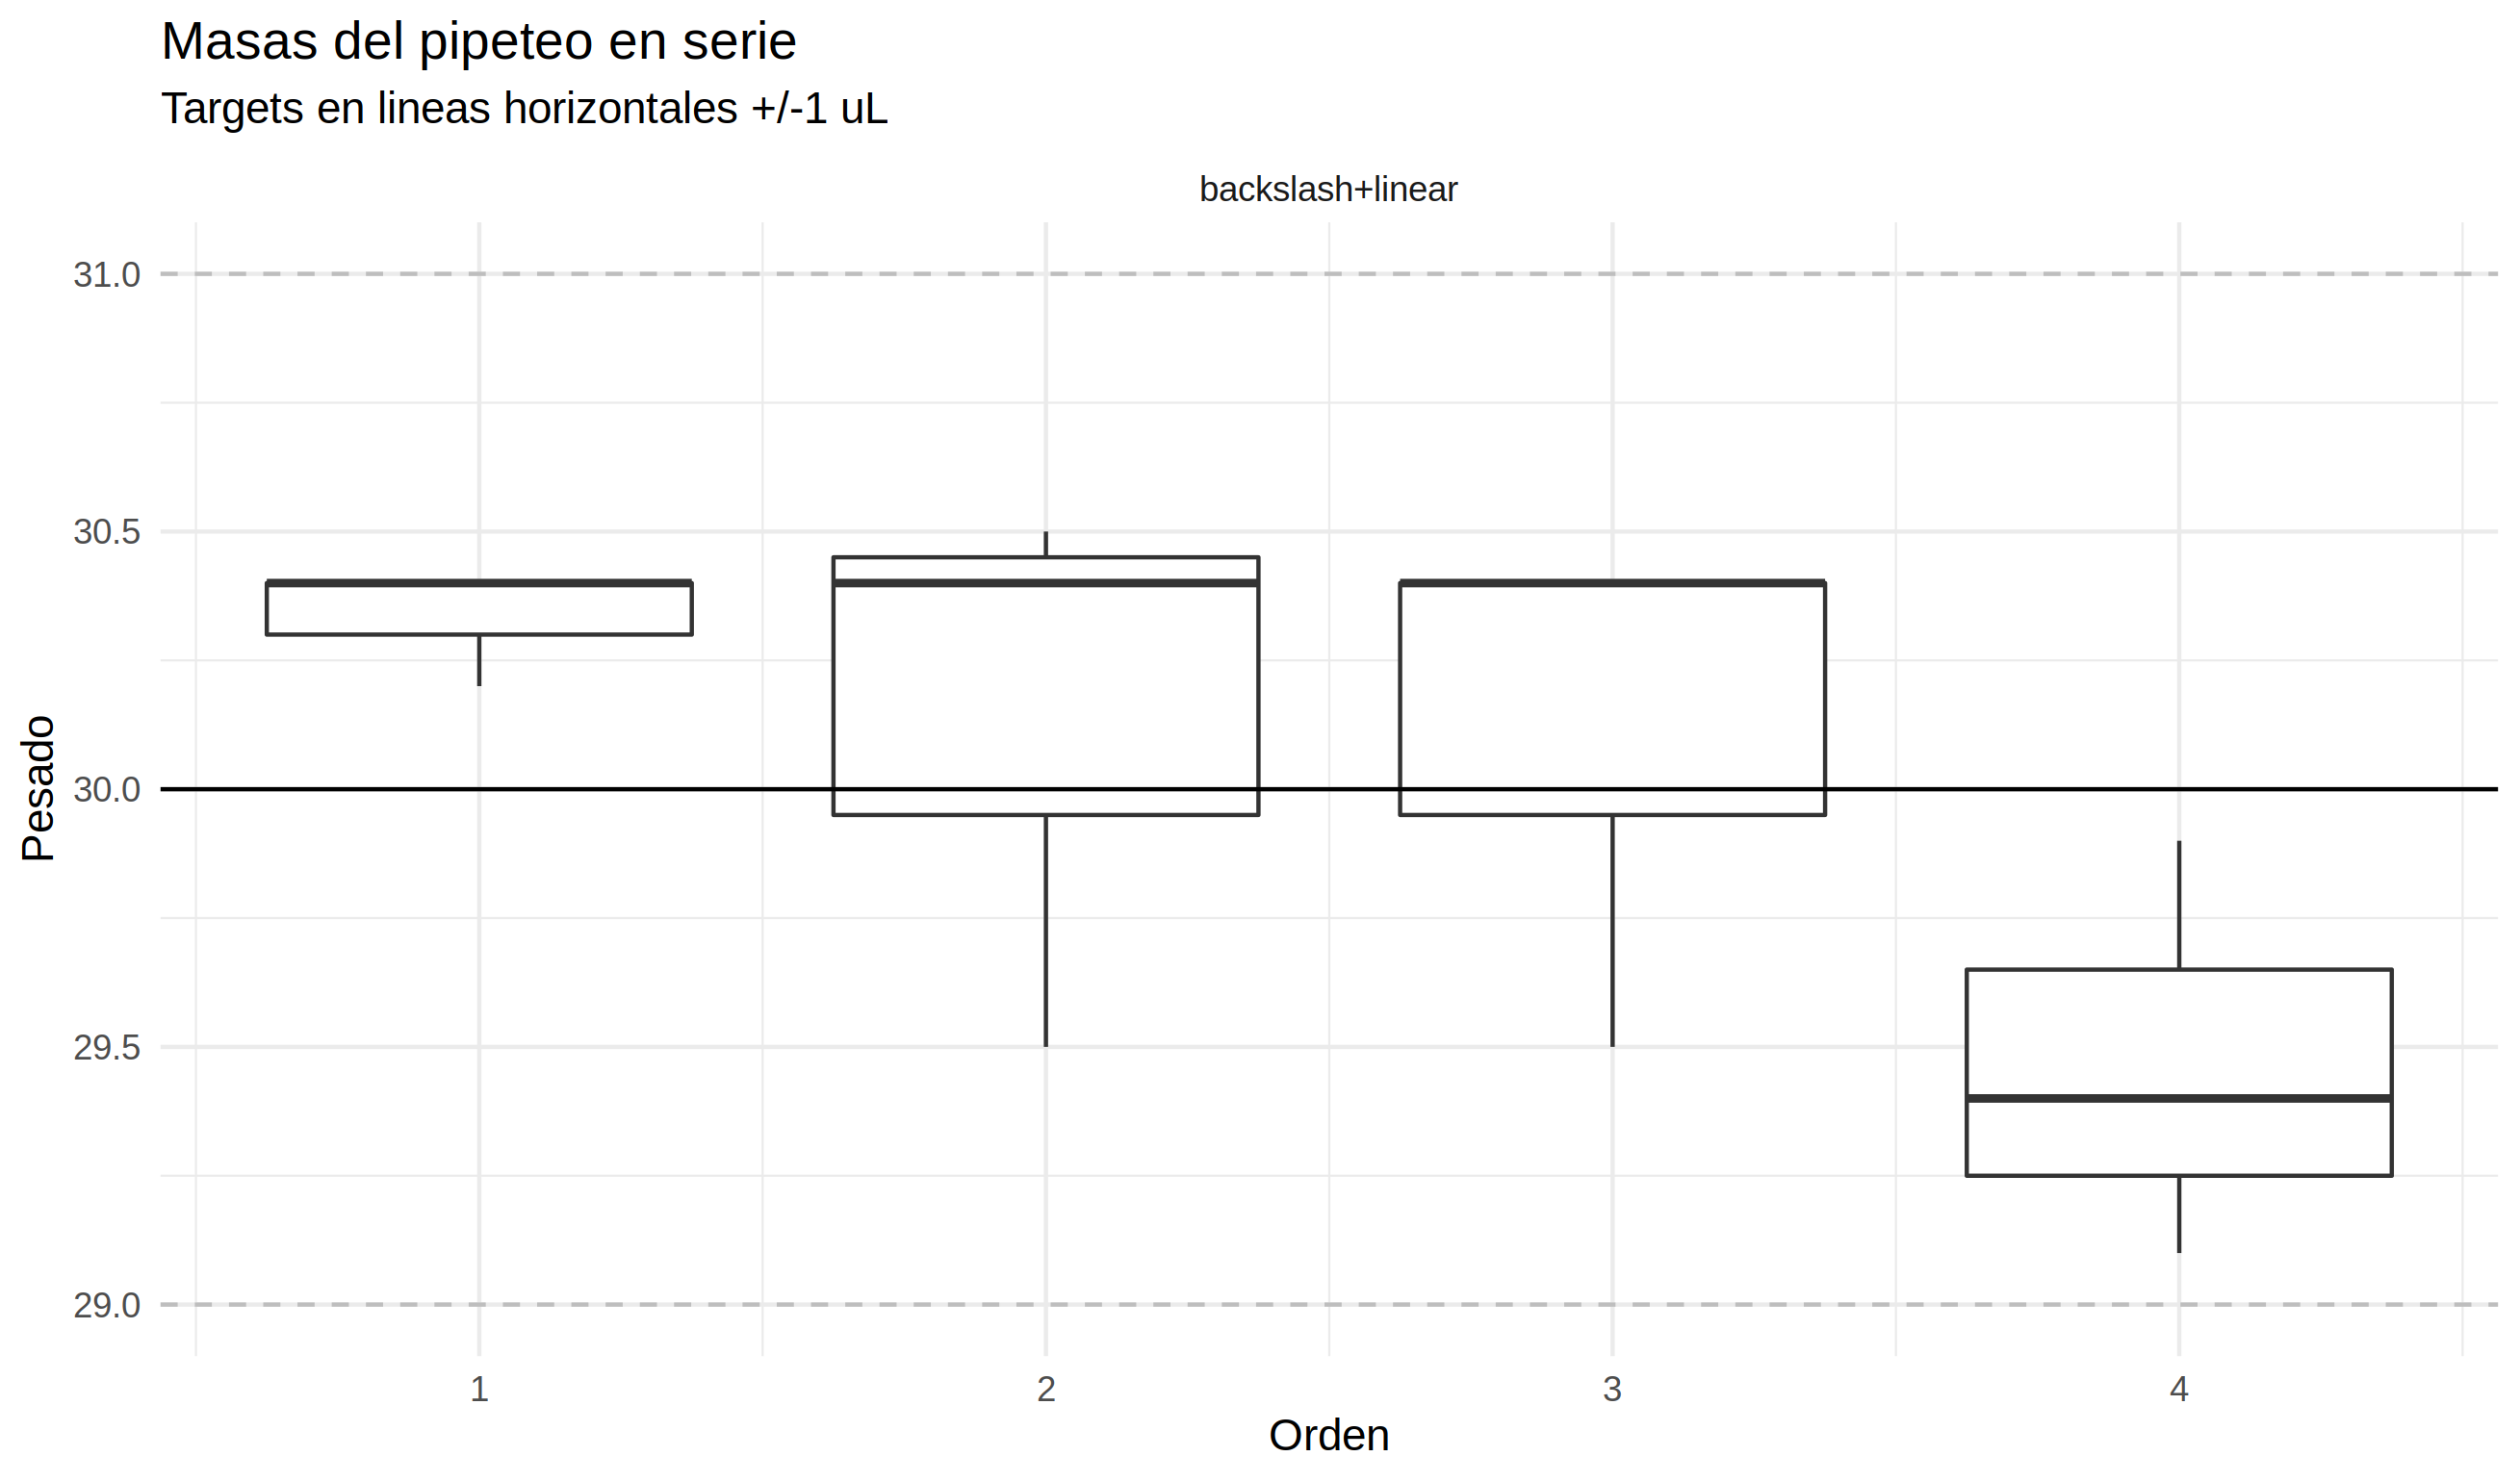
The observed deviations can have several causes, acting simultaneously:
- Consistent volumetric inaccuracy:
- Incorrect volume conversion factor: the ratio between linear displacement and volume is off.
- Systematic error observed across a series:
- The linear actuator has consistent mechanical imprecisions over its length. This can be corrected in theory, but its much easier to purchase quality mechanical components.
- Differences between aspirated and dispensed volume:
- The actuator has noticeable mechanical backlash: a change in direction requires a usually small "gap" of zero displacement. Corrections can be applied.
- Air may be leaking: the tip-holder or internal o-ring are not sealing correctly. Perform a test with a fully loaded tip.
- Differences in the first or last dispenses of a series:
- The first dispense consistently pours in excess: the causes are unclear. Corrections can be applied.
- The last dispense consistently falls short: some liquid remains in the tip due to surface tension. Corrections can be applied.
As mentioned before, a few adjustment factors can be changed to correct for these deviations.
After calibrating the micropipete, it will be able to accurately transfer the desired volume in both modes.
Adding corrections
Pipette tools in piper have several correction factors. They are described in the source code of the controller's pipettes plugin.
There are general correction parameters, that apply to all tips equally:
{
  "scaler": 28.274333882308138,
  "scaler_adjust": 1,

  "backlash_compensation_volume": 0.1,
  "extra_draw_volume": 8,
  "backlash_correction": true,
  "tip_priming_correction": false,
  "back_pour_correction": 19,
  "under_draw_correction": 1,
  "capillary_correction": true,
}
Other parameters are specific to particular tip stages:
Correction Parameters
Procedure to calibrate each correction parameter.
Backlash Compensation
Parameter: backlash_compensation_volume
This parameter corrects for the mechanical play or slack in the pipette's mechanism. Backlash can cause slight volume differences between aspirating and dispensing. It's particularly relevant when performing a series of alternating aspirate and dispense operations.
- Aspirate liquid into the tip up to 50% capacity. Use a 1000 or 200 uL tip. This will minimize surface tension effects.
- Perform a series of alternating aspirate and dispense operations with a 25% target volume.
- Observe any consistent volume discrepancies between aspirating and dispensing, due to the changes in the direction of motion.
- Adjust the
backlash_compensation_volumeto minimize these discrepancies. This parameter compensates for mechanical play in the pipette's mechanism.
First Draw Compensation
Parameter: extra_draw_volume
This parameter addresses the volume deficit that can occur on the first aspiration with a new tip.
When a dry tip is first used, some liquid may adhere to the tip's interior surface, leading to a lower aspirated volume.
This correction is crucial when starting a new pipetting task with a fresh tip.
- Use a new tip for each pipetting operation.
- Aspirate and dispense the target volume, observing any volume deficit on the first draw.
- Adjust the
extra_draw_volumeto compensate for this deficit.
Capillary Correction
Parameter: tension_correction
This correction accounts for the influence of surface tension, which can significantly affect dispensing accuracy at low volumes.
As the liquid volume in the tip decreases, the surface tension forces become more dominant, potentially leading to discrepancies in the dispensed volume.
This correction is especially relevant when working with volumes near the lower limit of a tip's range.
- Perform a series of dispensing operations with decreasing target volumes, approaching the lower limit of the pipette's range.
- Observe any volume discrepancies at low volumes due to capillary effects.
- Adjust the parameters in the
tension_correctiondictionary to minimize these discrepancies. This correction considers the influence of surface tension on dispensing accuracy at low volumes.
Under-Draw Correction
Parameter: under_draw_correction
This parameter corrects for systematic under-drawing of liquid during aspiration. Factors like the viscosity of the liquid or the pipetting speed can contribute to under-drawing. The under_draw_correction compensates for this consistent deficit, ensuring the desired volume is aspirated.
- Perform a series of aspirating operations with the target volume.
- Observe any consistent volume deficit during aspiration.
- Adjust the
under_draw_correctionto compensate for this deficit. This parameter corrects for systematic under-drawing of liquid.
Back-Pour Correction
Parameter: back_pour_correction
This correction addresses the "liquid backlash" that can happen during the first dispense after aspiration. When the pipette dispenses liquid, a small amount may remain in the tip due to surface tension. This residual liquid can then be inadvertently dispensed with the next pipetting action, leading to volume discrepancies, especially in serial dispensing operations.
- Perform serial dispensing operations with multiple dispenses per aspiration.
- Observe any volume discrepancies, particularly in the first dispense of a series.
- Adjust the
back_pour_correctionto minimize these discrepancies. This parameter corrects for liquid "backlash" during the initial dispense after aspiration.
Theory
Here are some useful reads:
- Very thorough paper: https://sci-hub.se/10.1007/s00769-015-1171-y
- http://www.demarcheiso17025.com/private/Calibrating%20a%20Micropipette.pdf
- https://shop.brand.de/media/import/1/27/32406/42485/42649/42753/994134_Airdisplacement_pipettes.pdf
- https://www.sciencedirect.com/science/article/pii/S0006349599771833
The main takeaway is that it's complicated. That's probably why micropipettes tend to be expensive.
My interpretation of previous calibration results and these documents is available in efecto_capilaridad.Rmd.
Surface-tension effects
Corrections for these effects, related to the interaction between the solution and the tip, must be implemented.
This is especially important for:
- Pipetting small volumes, as the capillary forces become more significant relative to the volume of liquid.
- Initial loading of the tip, as the dry captive air volume will absorb moisture from the liquid, affecting the aspirated volume.
- Expelling the entire volume from the tip, as surface tension can cause some liquid to remain in the tip.
Tips in the larger volume ranges (e.g. 1000 uL or 200 uL) are not expected to suffer as much from these effects, but it is particularly important to accoint for them in smaller tips (or when using larger tips to pipette small amounts).
Another effect is given by the tube: small volumes will be hard to dispense in tubes without liquid in them.
Water column weight
Theoretically, the weight of the liquid column that forms as the solution enters the tip should be compensated for.
In theory, traditional micropipettes should already have some correction for this, but the implementation is unclear. Perhaps the piston is slightly wider than the nominal volume to account for the weight of the liquid column.
Material effects
This is really complicated. There are many interactions between different tips and kinds of substances that could be corrected, but this is out of scope for us.
To account for these, we would need an automated calibration system, connected to a precision scale.
Homing calibration
Calibration of the homing sequence for electonically-actuated micropipettes.
Rationale
The initial state of a pipette is always assumed to be at the first stop. This means its shaft should be fully depressed, but not further than the start of the first stop (i.e. before the blow-out volume). OLA's micropipette only has one stop, you will use that as a starting position.
From this position the pipette is ready to load volume.
What we need to find is the distance that the carriage must travel from the homing sensor to reach the initial position (but not further).
Procedure
We must tune the initial position by taking some measurements and setting the travel_distance tool parameter, under the homing section.
  "homing": {
    "commands": [
      "T2",
      "HOME_EXTRUDER EXTRUDER=extruder2",
      "G90",
      "M82",
      "G1 E0 F6000; Total free motion minus 'travel_distance' below."
    ],
    "commands.desc": "Homing commands, leaving the pipette at the maximum volume.",
    "travel_distance": 30,
    "travel_distance.desc": "Free travel distance after homing, to the lowest volume position."
  },
This parameter defines how far the motor will travel downwards after hitting the limit switch on top of the pipette's actuator.